Verse Mapping

But what is verse mapping?
Well, just like the word study method we looked at two posts ago, verse mapping requires you to look up key words and their definitions. Then, similar to the S.O.A.P study method, you’ll research the context of the verse, take notes on what you learned through the study, and apply it to your life.
By combining these two study techniques, you will have such a rich experience studying the Bible. Keep in mind, this is meant to be a slow process. You may not finish in one sitting. Almost every post I’ve read online about verse mapping says it might take you a week or more to finish a map – depending on how deep you go and how much time you have. What matters is your consistent time with God, so don’t rush it. Enjoy it!
Let’s go through each step.
Step 1 | Find your verse and write it out. In the last post we discussed how to find a section of scripture to study. You can use your Bible’s table of content, study the verses used in the messages you hear at church, you can follow a reading plan, etc.
Step 2 | Look up the same verse in another translation to better understand the verse, but also to see how writers may have translated words differently. Here are a few translations I would recommend:
- NIV | The New International Version is a solid translation that is easy to understand. It is a “thought-for-thought” translation, which means translators looked at a whole sentence and translated it as a group so it would be easier to understand. Their goal was to capture the meaning of each verse, not necessarily the exact words. I would recommend this as your primary Bible translation.
- ESV | The English Standard Version has gained a lot of popularity lately. It is a “word-for-word” translation, meaning that the translators worked to translate each individual word into English, keeping a similar sentence structure. Sometimes word-for-word translations are hard to understand, but the ESV is pretty simple.
- NKJV | The New King James Version is a bit more difficult to understand, but it is a solid “word-for-word” translation as well. This would be a good option to use for step 2 because you’d find a lot of different translated words.
- NLT | The New Living Translation is like reading a story book. It is a “thought-for-thought” translation, but is on the edge of being a “paraphrase,” meaning the translation is looser to make the verses easier to understand. I wouldn’t recommend this as your primary study source, but the NLT is still a good option for step 2 because it is so easy to understand.
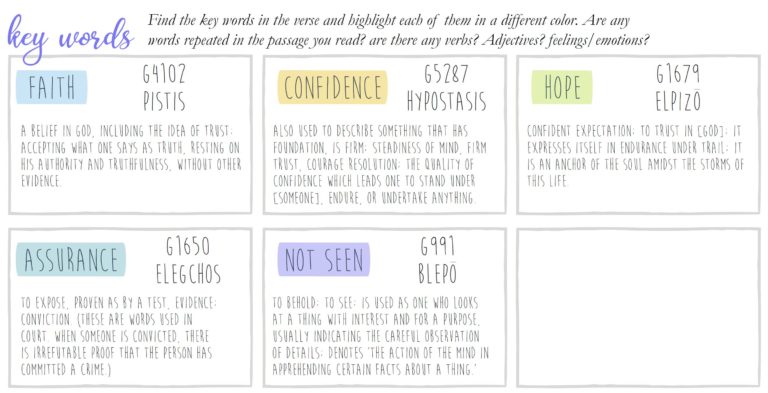
Step 3 | Find the key words in the verse and highlight each of them in a different color. You’ll recognize key words by asking these questions:
- Are there any words in the passage that are repeated?
- Are there any verbs?
- Are there any adjectives?
- Feelings or emotions?
- Commands?
- Another way to find key words is to look at your different translations and see which words were translated differently than your original translation. Those are probably words you’ll want to study a little deeper.
Once you’ve found your key words, write one in each square and highlight it the same color. Then look up the definition using Webster’s 1828 dictionary and Strong’s Concordance. You can find more instructions on this section in the Word Studies post. Same concept, just with a verse map instead of on its own. 
Step 4 | Now it’s time to study the context of the verse. This is very similar to what we discussed in the S.O.A.P. Studies post. Put on your investigator hat in this section and really do some digging. Ask yourself these questions and then look up the answers in the surrounding verses, in the book’s introduction page in your Bible, on Biblical websites, etc.
- Write about the people in this passage. Who is speaking/writing? Who are they with? Who are they writing to? What are they speaking about? Why?
- What were the customs of the time period that relate to this passage of Scripture? Was anything important going in at this time in history?
- Summarize what the passage around this verse is about.
- What themes or topics are discussed?
I love how Kristy Cambron describes this section on versemapping.com:
“Research the context and customs of what life would have been like for the [people] in your verse(s). Look up maps. Open history books. Read about what happened, why, and how it’s relevant to your life today. This is where you find the story connects to YOUR story with God. Research it, and write it down. What’s happening in the verse? To whom? Who are the characters in what you’re reading? How does their story relate to other stories/verses/persons in other areas of Scripture? What are the topics, themes, dates of significant events and/or theological elements of the verse(s) you’re researching? Let the Spirit loose in your heart in this section — God will give you some #WOW #facepalm #mindblown #jawdrop #IlovetheBible #intheWord moments if you let Him!”
The Cultrual Backgrounds Study Bible is another good resource, if you have one of those around.
Blue Letter Bible has some great resources on their website under the “Study” tab, as well.
Step 5 | Now it’s time to dig beyond just this one passage. Did you know that scripture is linked to other scripture? Sometimes a Bible verse will literally reference another verse, like when Jesus quoted the Old Testament, for example. Other times, verses will be linked because they use similar root words or discuss similar themes or Biblical concepts. These verses are called “cross-references” and they’re like a chain throughout the Bible. If you go to one cross-reference verse and find another cross-reference, follow the bunny trail! Who knows what gold you’ll find! Here are several ways you can find cross-references:
- The first way is to look and see if your Bible marks any little letters or numbers next to certain words in your verse. Usually, the cross-references are listed in the middle of the page, between the two columns of verses or at the bottom of the same page.
- Cross-references may also be listed in the study notes of your study Bible, also at the bottom of the same page.
- You can also dig into the verses listed in Strong’s Concordance that use the same Hebrew or Greek words from your word study.
Once you have found your cross-references, don’t stop there! Write them all out and explain how they link to the main verse you are studying. Bible commentaries such as the notes in your study Bible will help here. You can also use the commentaries found on Blue Letter Bible. And if you’re longing to expand your home library, I also recommend Believer’s Bible Commentary by William MacDonald.
Step 6 | The Reflection + Application section is all about summarizing what the Holy Spirit taught you through the verse map you just completed. What did you learn about God? What did you learn about yourself or about mankind? How does this apply to the season you’re walking through right now? Journal it out. Be as honest and descriptive as possible so you can look back on this verse map and see how you’ve grown over time.
Step 7 |And last but certainly not least, we have the prayer section. This is similar to step 6, but a space for you to write a prayer thanking the Lord for everything He’s taught you and for your time together. Use what you learned from your verse study as inspiration for your prayer. It’s a powerful tool to learn to pray scripture back to God. It reminds us of Biblical truths and when we pray it because we truly believe it, it shows God we trust Him.
If you’d like a visual to verse mapping, Lauren does such a great job of walking through the James Method on her YouTube channel. You can check it out, here, if you want.
I cannot stress enough, girls. Please do not rush this. Savor it like your favorite dessert. Maybe do one or two sections a day until you’re done. Really dig in and let the Lord help you uncover some treasure. If we were on an archeology dig or if we were digging for gold, we wouldn’t give up in 10 minutes! We’d keep going until we found what we were looking for! And the treasure you’ll uncover by studying God’s word is so much more valuable than that!